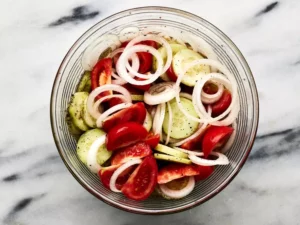
• 0 items
Wishlist

Login

Clay Coyote

We make art you can cook with

  • About
    • Contact & Directions
    • Story
    • Team
    • About the Clay Coyote Glazes
    • Press & Media
    • Events
    • The Potter’s House
    • Mission
    • Frequently Asked Questions
  • Blog
  • Shop!

Moco Loco

January 27, 2023 By Morgan

Bacon Fat is a layer in our French Onion SoupFrom Nic in the Gallery-

Moco Loco is one of my favorite work week meals. It’s a Hawaiian dish that consists of a hamburger served over rice and is topped with brown gravy, a fried egg and plenty of sliced green onions. It is a comforting, filling, and savory dish that feels familiar, but is definitely out of the ordinary.

If I was going to make a small portion of it, my favorite Coyote piece the Mini-Savory Pie Dish could get the job done, but I highly recommend making more Moco Loco than a single serving. The Clay Coyote Cazuela or Large Skillet would be perfect for the job.

My go to recipe for Moco Loco comes from Chef John and his Foodwishes Youtube channel.

Here is the recipe from Chef John for making two servings: (I double this to serve two very hungry people or two people with left overs for lunch the next day)

Ingredients:

  • 2 ground beef patties
  • 1 pinch salt and freshly ground black pepper to taste
  • 1 pinch cayenne pepper
  • 1 ½ cups beef stock
  • 4 teaspoons soy sauce
  • 1 teaspoon Worcestershire sauce
  • 4 teaspoons cornstarch
  • 2 teaspoons ketchup
  • 2 teaspoons white sugar (Optional)
  • 2 drops sesame oil, or to taste
  • 2 teaspoons unsalted butter, divided
  • 2 tablespoons minced green onions, white and light green parts only
  • 2 eggs
  • 2 cups hot cooked white rice
  1. Season your hamburger patties with salt, pepper and cayenne, set them aside.
  2. Whisk together (a Whiskey bowl would work great) soy sauce, Worcestershire sauce, corn starch, ketchup, sesame oil, beef stock and sugar and set aside.
  3. Melt some butter in your Large Skillet or Cazuela and cook your beef patties, halfway through cooking them add the sliced green onions, let them brown a bit, once they burgers are done, remove them and most of the green onions and set them aside.
  4. Pour your wet mixture (step 3) into your pan and deglaze all that yummy goodness. Stir and scrap your mixture until a gravy forms, then put it on low heat, just to keep it warm.
  5. Add butter to another pan (your time to shine Mini-Savory or Small Skillet!) and cook your eggs. I highly recommend a runny yoke that you can break into.
  6. Divide your hot cooked rice into two portions and put into Bowls. Put a hamburger over each portion of rice, then top that with a fried egg, gravy and green onions. (I sprinkle a little more cayenne on top).

I hope you give this Hawaiian dish a try, it really is more then its individual parts.

-Nic

FacebookTwitterLinkedInPinterestEmailPrintFriendly

Filed Under: Foodie News, On the Horizon, Our Story, Pottery, Recipes Tagged With: beef, cazuela, cooking with clay, cooking with the coyotes, flameware, green onions, Hawaiian, recipe, runny yoke, skillet

Recipe Revisited: Ella’s Banana Bread

July 6, 2022 By Morgan

From Emily in the Gallery ~

Ripe Bananas

These hot summer days have seemed to decrease the shelf life of the bananas in my home, we cant eat them fast enough! Or honestly, maybe we are just busy and forget about them… ill still blame the weather though.

Here is a great banana bread recipe we first shared with you back in 2010. I would suggest incorporating our Clay Coyote Baking Dish, Mixing Bowl & Salad Bowl in Shallow in any of our beautiful glazes. Enjoy!


Ella’s Banana Bread

3 ripe bananas
3 Tbsp. sour milk
½ cup butter or margarine
1 cup sugar
2 eggs
2 cups flour
1 tsp. baking soda
¼ tsp. salt

1 cup chopped nuts (optional)

Mash bananas with sour milk and set aside. Cream butter. Add sugar and mix well. Add eggs and beat well. Add banana mixture and mix to incorporate. Fold in dry ingredients. Add nuts if desired.

Pour into baking dish. Bake at 350 degrees for 45 minutes to 1 hour or until cake tester comes out clean when loaf is pierced. Cool and store in plastic. Freezes well.

Notes:
You can make sour milk by adding a small amount of vinegar or baking soda to regular milk.

Loaves will release from pan more easily if bottom of pan is lined with wax paper

Pottery Featured in this Recipe: 

  • Baking Dish 
  • Mixing Bowl with Whisk
  • Salad Bowl, Shallow 

Want more inspiration? Check out more posts on our blog here to see how we use our pots, our Pinterest page here for more recipes and ideas, and follow us on Instagram here to stay up to date!

FacebookTwitterLinkedInPinterestEmailPrintFriendly

Filed Under: Recipes Tagged With: Cooking In Clay, cooking with the coyotes, food, gallery, gift ideas, Hutchinson, Minnesota, pottery, recipe

Recipe Revisited: Paula’s Hummus

June 22, 2022 By Betsy Price

From Emily in the Gallery ~

The first day of summer was yesterday, and I cant help but dream and salivate over the thought of all the fresh  veggies that will be picked from our home garden, picked up from the farmers market and/or given to us by the generosity of friend and neighbors in the weeks to come. My favorite thing to dip veggies in is hummus, and nothing beats homemade hummus. Below you will find a post first written by Valerie in February of 2011 using Paula Wolferts recipe for “My Best Hummus” .


Paula’s Hummus recipe

I really LOVE hummus! I always thought I did, but I never realized how much until now. Over the years, I have bought countless containers of hummus. I’ve tried every flavor. ( black olive, roasted red pepper, garlic…) Every container ended up crusty and hard in the back of my refrigerator. I made Paula Wolfert’s hummus, and it was gone in 2 days. First, I ate it with warm pita bread. Then, I used it as a dip for carrots and celery.  I started adding it to everything. I spread it on my sandwich. It substituted mayo in my new version of deviled eggs. I ate the last spoonful right from the bowl. I guarantee if you try this, you will never buy it again. It is very simple, and much less expensive to make yourself.

hummus1“My Best Hummus”

1 cup dried chickpeas

Coarse seal salt

1/4 cup tahini, preferably organic

2 garlic cloves

1/4 cup fresh lemon juice

1-2 Tablespoons extra virgin olive oil

Ground Cumin and crushed hot red pepper

1. In a large bowl, soak the chickpeas with 3 cups of water and 2 tablespoons coarse salt for at least 12 hours.

2. Drain the chickpeas, rinse them well and put them in a earthenware pot. ( I used my flameware cazuela) Set to low-medium heat and bring the water to a boil. Reduce the heat to simmer and cook, partially covered, until the chickpeas are very tender, about 2 hours. Add more water if it evaporates.

3. Drain the chickpeas, reserving about 1/4 cup of the cooking liquid. Working by the handful, submerge the chickpeas in a deep pot or bowl of cold water and rub the chickpeas between your hands and rub and pinch off the skins. The skins will rise to the surface, remove and discard them. Repeat with the remaining handfuls of chickpeas. Set aside about 1/4 cup peeled chickpeas for garnish. (It only takes around 10 minutes to shell the chickpeas.)

4. Stir up the tahini in its jar with the oil until well blended. Place the tahini in blender jar and blend the tahini, garlic, and lemon juices until the mixture “whitens.” With the machine running, add the reserved liquor. Add the 1 3/4 cups peeled chickpeas and process until smooth and glossy. Correct the seasoning with salt and lemon juice. (I added quite a bit more lemon juice.) Allow the hummus to mellow at room temperature for 1 to 2 hours. (This part is REALLY hard.)

5. To serve as a dip, spread the puree on a shallow serving dish. Use the back of a spoon to make a well in the center, drizzle with olive oil, and sprinkle with cumin and/ or hot pepper, and scatter the remaining chickpeas on top.

hummus2
My hummus “mellowing.”

There are shortcuts to creating this recipe. You could use canned chickpeas, or bottled lemon juice. I would recommend not doing either. You would be amazed how much changing certain aspects of Paula’s recipes affects the flavor. I also think that shelling your own chickpeas invests you into the dish, and you become connected to it. This same connection is found through using earthenware to prepare the dish. I have a pottery lemon juicer my mom gave me for Christmas. I was excited to have a recipe to use my new piece. I would recommend experimenting with different spices. Get creative!  If you find something delicious, let us know. We would love to hear any suggestions or ideas you may have.


Pottery Featured in this Recipe: 

  • Flameware Cazuela
  • Mixing Bowl with Whisk
  • Salad Bowl, Shallow 
  • Soup Bowl 
FacebookTwitterLinkedInPinterestEmailPrintFriendly

Filed Under: Recipes Tagged With: cazuela, cooking with clay, cooking with the coyotes, flameware, handmade, Mediterranean Diet, Minnesota, paula wolfert, recipe

Cooking with the Coyotes: Warm Bacon and Blue Cheese Dip

June 16, 2022 By Morgan

From Emily in the Gallery~

I am the newest member of the Coyote family, and am so excited not only to be surrounded by the pottery that I have loved and admired for years, but also to engage in experimentation in the kitchen with cooking and trying new recipes and techniques. My history in the kitchen is not the prettiest, or tastiest (ask my husband) but boy is this place inspiring!

This past weekend we had family visiting from sunny AZ and I wanted to make something yummy to snack on as we sat by our pool on the hot summer day. I was planning on making  the Soberdough Hatch Green Chile Cheddar bread we sell in the gallery, and it paired perfectly when all said and done.

Warm Bacon Blue Cheese Dip

-Cookin’ with the Coyote Cookbook

Ingredients:

7 bacon slices, diced

2 garlic cloves, minced

8 oz. cream cheese, room temperature

1/4 cup half & half

4 oz. blue cheese, crumbled

2 T chopped fresh chives

Bread, carrots & celery for dipping

Instructions:

Cook bacon until almost crisp – about 7 minutes. Drain fat, add garlic and cook until bacon is crisp.

Beat cream cheese until smooth with an electric mixer. Add half & half and beat to combine.

Stir in bacon mixture, blue cheese and chives. Transfer to a ovenproof baking dish, I used the Clay Coyote Soup Bowl and covered with tin foil.

Can be prepared one day ahead, however, I loved it straight out of the oven in all its bubbling gloriousness.

If you wanted to double the recipe, I would suggest using our Clay Coyote Baking Dish. 


Clay Coyote Soup and Chili Bowl
Clay Coyote Soup Bowl
Clay Coyote Baking Dish
Soberdough
Soberdough in Green Hatch Chili Cheddar
FacebookTwitterLinkedInPinterestEmailPrintFriendly

Filed Under: Recipes Tagged With: baking dish, clay coyote soup bowl, Cooking In Clay, handmade, recipe, soberdough

Cooking with WCCO: Watch Morgan Bake No-Knead Bread on CBS / Channel 4

November 27, 2021 By Morgan

Looking for a fun, easy baking project? No-Knead Bread is easy!

Watch Clay Coyote’s CEO, Morgan Baum, cooking live on channel 4, WCCO-CBS.

Learn more, get the recipe, tips, and variations here. 

And order your Bread Baker today, use code FREESHIP at checkout to save!

FacebookTwitterLinkedInPinterestEmailPrintFriendly

Filed Under: Foodie News, On the Horizon, Our Story, Potter's Life, Pottery, Recipes, The Gallery, The Studio Tagged With: bread, bread baking, cooking with clay, handmade pottery, Mediterranean Diet, no knead, no knead bread, recipe, small business saturday, videos, WCCO

  • Go to page 1
  • Go to page 2
  • Go to page 3
  • Interim pages omitted …
  • Go to page 7
Clay Coyote

Hours

Locations & Directions

Email [email protected]

Phone (320) 587-2599

Mail PO BOX 363, Hutchinson, MN 55350

© 2023 Clay Coyote · All Rights Reserved
Developed by Vivid Image · Log in · Privacy Policy

  • Facebook
  • Instagram
  • Pinterest
  • Twitter

Copyright © 2023 · Clay Coyote · All Rights Reserved · Developed by Vivid Image · Log in

Create a new list

Use code FREESHIP at checkout to save on orders over $99 (Continental USA). Dismiss