• 0 items
Wishlist

Login

Clay Coyote

We make art you can cook with

  • About
    • Contact & Directions
    • Story
    • Team
    • About the Clay Coyote Glazes
    • Press & Media
    • Events
    • The Potter’s House
    • Mission
    • Frequently Asked Questions
  • Blog
  • Shop!

Clay Coyote No-Knead Bread Baking Recipes, Variations, and Techniques

November 26, 2021 By Morgan

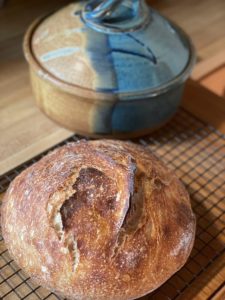
We’ve been making No-Knead Bread Bakers at the Clay Coyote for more than a decade. I looked back, the first mention was back in 2010. The thing about this technique is that there are many, many variations. It’s also a super forgiving recipe, which is good for a baker of my caliber. 

We have a friend that refers to herself as the Anxious Baker, if I were to give myself a moniker it would be the Unconventional Baker. Following directions has never really been my thing. Measuring, meh. Where cooking is an art, and all my wild ways are heralded; baking is a science and requires a little more restraint.

That said, No-Knead Bread Baking is right up my alley. Three ingredients, four if you count water, and a little bit of patience. Ok, fine, patience is not really up my alley, but I’ve been practicing it a lot lately and I’m coming around. 

I will share that baking your own bread is very satisfactory. It’s very primitive and historic in its own way. According to wikipedia, the first known bread was baked in Eastern Europe around 9,100 years ago, I’d say that’s historic.  

No-Knead Bread Baking Process: 

  • Combine flour, yeast and salt. Add 1 ⅔  cups water, and stir until blended; dough will be shaggy and sticky.  
  • Cover bowl, let dough rest at least 12 hours, preferably about 18 hours, at warm room temperature. Use a heating pad in cooler months. 
  • The dough will be sticky and bubbly. 
  • Add about ¼ cup flour, folding in gently. 
  • Let rest for another 15 minutes.
  • Flour a surface, and using just enough flour to keep dough from sticking to the work surface or to your fingers, gently and quickly shape dough into a ball. 
  • Cover and let rise for about 2 hours. When it is ready, the dough will be more than double in size and will not readily spring back when poked with a finger. 
  • Set dough aside on a floured surface, we use a breadboard or towel.
  • Clean and dry bread baker. 
  • Set the bread baker with the lid on in a cold oven and turn on heat to 400F.  
  • Allow the bread baker to preheat for about 20-30 minutes. 
  • Using hot pads, pull the bread baker out of the oven, carefully roll the dough ball into the hot base. 
  • Cover and return to the oven for 30 minutes. 
  • Remove the lid and bake for another 15 to 30 minutes, until the loaf is beautifully browned. 
  • Cool on a rack. 

Ingredients: 

  • 384 grams (about 3 cups, sifted) flour 
  • 1 teaspoon yeast
  • 1 teaspoon salt
  • 1 ⅔ cups water 
  • Additional cup of flour for mixing and dusting. 

Yields one 1 ½ pound loaf of bread 

Now, let’s get creative: Try some other combinations! Depending on the mix-in combos you’ll add them at different times. In an effort to make it easier we’ll call the 12-18 hour part the 1st rise, then the 15 minutes the 2nd rise, then the 2 hours right before it goes in the oven the 3rd rise. It’s not 100% technical, but it will help when thinking about your flavor combos. 

  • Wild Rice and Cranberry: Add ¼ cup cranberries (if dried, soak in a little warm water to plump up), ½ cup cooked wild rice, a ½ teaspoon of cinnamon, and a tablespoon of orange zest into the 1st rise. 
  • Everything but the Bagel: Add 1 tablespoon of everything but the bagel mix to the 3rd rise. After baking, brush on a little butter and sprinkle more mix on top. 
  • Jalapeños and Cheddar: Add ½ cup shredded cheddar and ½ cup sliced jalapeños to the 1st rise. You may want to strategically place a few on the top of the loaf before you pop it in the oven for presentation. And you can use fresh or jarred jalapeños, but you may want to pat them dry a little if the jar ones are super wet. 
  • Olive: Add ½ cup fresh chopped Kalamata olives and ¼ cup of a fresh herb like rosemary, sage, thyme, or basil to the 1st rise. 
  • Bake like Prince and Let’s Go Crazy: Think about your favorite possible combos and give it a try …

Gluten Free Thoughts: 

  • We have used Cup4Cup flour as our best substitute, but we also highly recommend the gluten free recipe options in Nancy Baggett’s Kneadlessly Simple Cookbook (which is out of print but you can find it at the library and used book resellers).
  • The general rule of thumb seems to be that you can swap out the flour, but you’ll need to make sure the substitute has xanthan gum or that you add some in. 

We have a couple cookbooks that have no-knead recipes in them. Check out New World Sourdough if you’re looking for sourdough options. 

If you’re looking for a Flameware option you could go with a Dutch Oven or a Tagine, we have Coyote customers who use both regularly for baking bread. 

And if you’re more of a Quick Bread kinda person (me) then we recommend our Square Baking Dish, it’s wider and lower than a loaf pan, but the same volume. Our trusty Banana Bread recipe is a crowd pleaser. 

As always, if you have any questions we’re here to help. While we’re not professional bakers or chefs, we are professional potters and we’re constantly experimenting and learning new ways to put our pots into action. 

Happy Baking! 

Morgan & The Coyotes 


After 12-18 hours
2 hours later
Yum, so airy!
Clay Coyote No-Knead Bread Baking Recipes, Variations, and Techniques
Crusty No-Knead Bread

​

FacebookTwitterLinkedInPinterestEmailPrintFriendly

Filed Under: Foodie News, On the Horizon, Our Story, Potter's Life, Pottery, Recipes, The Gallery, The Studio Tagged With: Baking, christmas gifts, cooking with clay, flour, gifts, history of bread, Mediterranean Diet, no knead, no knead bread recipe, Recipes, slat, sourdough, water, yeast

Flameware Skillet Buttermilk Biscuits

May 14, 2019 By Eric Lofdahl

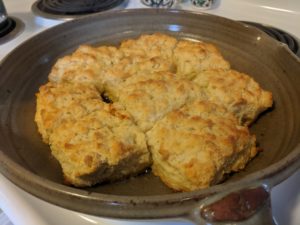
Despite spending years working in kitchens, I’ve never been much of a baker. Most of my time was spent juggling several pans on burners; a collection of steaks, burgers, chicken, and salmon on the grill; Reubens, grilled cheese sandwiches, and quesadillas on the flat top; and four baskets going at once in the deep fryer. I’ve been lucky to know numerous wonderful bakers who have provided me with baked goods throughout the years. My grandmother’s pies, my brother’s chocolate chip cookies, his fiancee’s scones, a coworker’s flourless chocolate cake, and my best friend’s wife who is a professional baker and made cupcakes for their wedding are all at the top of my favorites list. You might be able to tell that I have a bit of a sweet tooth.

Finished Flameware Skillet Buttermilk BiscuitsIt just so happens that National Buttermilk Biscuit Day is on May 14th, and I love buttermilk biscuits. I figured that biscuits were as good of a place to start as any, and I could use a familiar tool to make them: the Clay Coyote Flameware Large Skillet.

While looking online for recipes, I was searching for simplicity. There are a lot of opinions out there about what techniques make good buttermilk biscuits. I read about folding the dough three times, folding it four times, cutting your butter into both thin slices and pea sized cubes, mixing in the butter with your hands, mixing it in with a rubber spatula, crowding the pan, not crowding the pan, and . . . I think you get the picture. There was one common thread in all the recipes – cold ingredients, especially the butter. This is the real key to fluffy biscuits. Eventually I discovered this recipe from Damn Delicious. It features simple ingredients, relatively few steps, and is meant to be done in a cast iron skillet. I had to improvise a bit during the process; I neglected to locate a box grater before starting. But overall I stayed true to the recipe, while using our flameware skillet instead of cast iron, and the biscuits turned out great.

Ingredients

  • 4 c all-purpose flour
  • 4 tsp baking powder
  • 1¼ tsp kosher salt
  • 1 tsp baking soda
  • ¾ c unsalted butter, frozen
  • ¼ c unsalted butter, melted
  • 1¾ c buttermilk (I needed more than this, I would recommend having at least another ¼ c ready)

Directions

  • Skillet Buttermilk Biscuits in the OvenPreheat oven to 450 degrees F, place skillet in the oven while it preheats.
  • Combine flour, baking powder, salt, and baking soda in a large bowl
  • Grate the butter into the flour mixture using the large holes of a box grater (Since I did not have a box grater on hand, I cut up the frozen butter with a knife. You want roughly pea size pieces.)
  • Add buttermilk and stir using a rubber spatula until a dough starts to form
  • Lightly flour a surface, turn out the dough, and knead a few times until it comes together. Be careful not to overwork the dough.
  • Using a rolling pin, roll the dough into a 9 inch square and then trim the edges to create an 8 inch square.
  • Remove skillet from the oven and lightly oil.
  • Cut the dough into 9 to 12 biscuits. This can be done with a biscuit cutter or a knife. Place prepared biscuits into the skillet.
  • Brush melted butter onto the top of the biscuits.
  • Put the skillet back in the oven and bake for 16 – 19 minutes, or until golden brown.

This recipe made a lot of biscuits. I ended up getting around fifteen out of it, and had to bake them in two batches. I pulled the first batch, ate one, and plated and covered the rest in foil. I felt good about the results after eating that first biscuit. It was fluffy, buttery, and had a crisp top and bottom. The rest of the biscuits I delivered to the Clay Coyote, where I knew there would be some ready and willing taste testers. After everybody went back for a second biscuit, I was feeling really happy with myself.

First Batch of Buttermilk Biscuits in a Flameware Skillet
Second Batch of Buttermilk Biscuits in a Flameware Skillet

Any biscuits that did not fit in the pan, I placed on a plate in the fridge. I had also combined the dough trimmings to make an extra biscuit or two. As an experiment, I let those sit for a few hours before firing up the oven and baking them. The second batch also turned out great, so don’t be afraid of preparing the biscuits ahead of time and baking them when you’re ready. I would guess they would hold up overnight, cold ingredients are important after all, so you could have fresh biscuits in the morning in just about twenty minutes.

Give this recipe a try yourself, and let us know how they turned out. If you need a skillet, we have them in stock and I bet our flameware cazuela would also be great for this recipe. If you stop in to pick up a skillet, grab some of the new jams and fruit spreads we have from Tait Farm Foods to pair with the biscuits as well. Happy National Buttermilk Biscuit Day!

FacebookTwitterLinkedInPinterestEmailPrintFriendly

Filed Under: Our Story, Potter's Life, Pottery, Recipes Tagged With: Baking, buttermilk biscuits, clay coyote flameware, cooking with clay, flameware, flameware cazuela, flameware skillet, novice baker, simple recipes, skillet buttermilk biscuits

First Post: Banana Bread Revisited

April 8, 2019 By Morgan

Blueberry Lemon Spice Banana Bread all done!
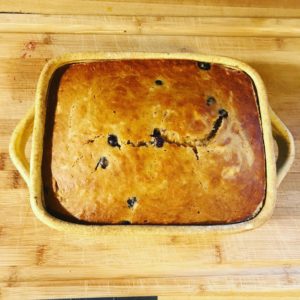
The first blog we ever posted on the original Clay Coyote website was about banana bread. It’s been almost 20 years since that recipe went live.

I’ve traveled many places and had many great banana breads since, and my recipe has evolved. But it’s still got the basics: super ripe bananas, flour, sugar, baking soda, eggs, cooked in a handmade clay pot.

From there you can get creative. Swap different fats for the butter. Swap different spices. Add moisture with sour cream or apple sauce. And pick your mix in from chocolate chips, to walnuts, pecans, or dried cranberries.

Start with the basics and explore from there.

Blueberry Lemon Spice Banana Bread 
Preheat oven 350F
Mush up bananas and butter
Mix in brown sugar, eggs, sour cream, vanilla, and all the spices
Add baking soda and salt
Add flour last
Pour into Clay Coyote Square Baker
Bake at 350F for 55-65 minutes

Ingredients:
— 3 ripe bananas
— 6 table butter
— 2 eggs
— 3/4 cup light brown sugar
— 3 oz. sour cream
— 1 tsp. vanilla extract
— 1 tea cinnamon
— 1/2 tea nutmeg
— 1/2 tea cloves
— 1 1/4 tablespoon baking soda
— Pinch salt
— 2 cup flour
— 1/2 cup fresh blueberries
— 1 tea fresh squeezed lemon juice

Blueberry Lemon Spice Banana Bread Ingredients
Blueberry Lemon Spice Banana Bread with Blueberries
Blueberry Lemon Spice Banana Bread with in process
Blueberry Lemon Spice Banana Bread all done!
Up close photo of Blueberry Lemon Spice Banana Bread
Blueberry Lemon Spice Banana Bread in a clay coyote square baker
#6 Square Baker
FacebookTwitterLinkedInPinterestEmailPrintFriendly

Filed Under: Foodie News, Our Story, Potter's Life, Pottery, Recipes Tagged With: baked in clay, Baking, banana bread, cooking with clay, Cooking with Coyote East, first post, hello world, ingredients, lemons, recipe, revisited, square baker, yellow salt

Baking with Sara Baker

September 8, 2016 By Morgan

Baking with Sara Baker
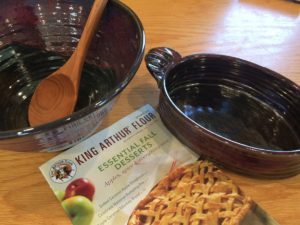
I just got my new King Arthur Flour fall catalog, everything, I mean, everything looks delicious. It’s got tons of different apple recipes. And it’s perfect timing because our apple trees out here at the Clay Coyote are in full bloom. We’re eating apples with every meal.

Today, I’m baking an apple crisp and mini apple pies. I love Sara Baker’s deep colored pottery for this task. Her reds are super red, her blues are dark and deep, and her purples pop off the pots.

We’ve just got a new delivery from Sara, so there’s tons of great pots to choose from in the Gallery.


PS: Wine goes well with cooking too! Sara Baker wine cups

FacebookTwitterLinkedInPinterestEmailPrintFriendly

Filed Under: Foodie News, Recipes, The Gallery Tagged With: apples, Baking, cooking, Cups, King Arthur, Sara Baker, wine

No-Knead Bread (with Sourdough Option)

February 5, 2010 By claycoyote

Adapted from Jim Lahey, Sullivan Street Bakery

Originally published Nov. 8th, 2006 New York Times

sourdough cutThis one is really easy, and the bread is as close to artisan you can get without going to all the trouble. A sourdough version follows.

There are 3 books we recommend, Lahey’s“My Bread”,  Zoe Francois’ “Artisan Bread in 5 Minutes a Day” , and Nancy Baggett’s “Kneadlessly SImple”.

No-Knead Bread

Yields one 1 1/2 pound loaf

  • 3 cups all-purpose or bread flour, more for dusting
  • ¼ teaspoon instant yeast
  • 1¼ teaspoons salt (may take a hair more)
  • Cornmeal or wheat bran as needed.
  • We, of course, recommend the Clay Coyote No-Knead Bread Baker (shown in the pictures) for mixing and baking.   But, if you have to, any bowl will do.  Interesting, a tagine makes a perfect baker also.

1. In a large bowl combine flour, yeast and salt. Add 1 5/8 cups water, and stir until blended; dough will be shaggy and sticky. Cover bowl with plastic wrap. Let dough rest at least 12 hours, preferably about 18, at warm room temperature, about 70 degrees. If your thermostat cuts back at night, place on stovetop, set oven to minimal temp (probably 150-170) and place a dish towel over the covered bowl.

2. Dough is ready when its surface is dotted with bubbles.sourdough strip
Lightly flour a work surface and place dough on it; sprinkle it with a little more flour and fold it over on itself once or twice. Cover loosely with plastic wrap and let rest about 15 minutes.

3. Using just enough flour to keep dough from sticking to work surface or to your fingers, gently and quickly shape dough into a ball.
Generously coat a cotton towel (not terry cloth) with flour, wheat bran or cornmeal; put dough seam side down on towel and dust with more flour, bran or cornmeal.
Cover with another cotton towel and let rise for about 2 hours. When it is ready, dough will be more than double in size and will not readily spring back when poked with a finger.
(Note, in the photos, I used a bread board, covered with the bowl in which the initial raising took place, and put the bowl over the dough upside down. Saves messing up a towel. If the bowl is warm, it will speed the raising).

4. At least a half-hour before dough is ready, heat oven to 400 degrees. Put your Clay Coyote No-Knead Bread bowl (or other bowl if you have to) with lid in oven as it heats. When dough is ready, use hot pads to carefully remove pot from oven. Slide your hand under towel and turn dough over into the pot, seam side up; it may look like a mess, but that is O.K. Shake pan once or twice if dough is unevenly distributed; it will straighten out as it bakes.
Cover with lid and bake 30 minutes, then remove lid and bake another 15 to 30 minutes, until loaf is beautifully browned. Cool on a rack.

Sourdough FinishedSOURDOUGH OPTION

If you’ve got a starter, instead of yeast, put a 1/2 cup of starter in initial batter. Then follow the rest of the directions. Be sure to give it the full 18 hours or more. You’ll get a tangy sourdough loaf.

FacebookTwitterLinkedInPinterestEmailPrintFriendly

Filed Under: Recipes Tagged With: artisan bread, Baking, Bittman, bread, Lahey, no knead bread, no knead bread recipe

Clay Coyote

Hours

Locations & Directions

Email [email protected]

Phone (320) 587-2599

Mail PO BOX 363, Hutchinson, MN 55350

© 2023 Clay Coyote · All Rights Reserved
Developed by Vivid Image · Log in · Privacy Policy

  • Facebook
  • Instagram
  • Pinterest
  • Twitter

Copyright © 2023 · Clay Coyote · All Rights Reserved · Developed by Vivid Image · Log in

Create a new list

Use code FREESHIP at checkout to save on orders over $99 (Continental USA). Dismiss