 Open up clay box
- Weigh out the right amount of clay depending on the item
- Wedge the clay, like kneading bread
- Bring the clay to your working station
- Using the wheel or roller, form initial piece
- Set piece aside to firm up, will still be pretty soft and malleable
- Turn piece occasionally to encourage even drying
- Wrap overnight
- Unwrap following day, looking for firming up to leather-hard stage
- Place upside down to trim the bottom (nice and smooth!)
- Add handles, buttons, and any other attachments
- Stamp bottom
- Place on cart to dry, looking for bone dry
- Check piece every couple days to ensure even drying
- Move piece to firing room
- Sand and inspect each piece before going into first firing
- Load into bisque kiln
- Fire to 1800 F
- Cool
- Unload bisque kiln
- Move to glazing area
- Inspect each piece and wipe off any dust
- Wax bottoms, rims, and handles where necessary (wax prevents pot from sticking to kiln shelf)
- Dunk pots into glaze buckets
- Dunk pots into glaze buckets again
- For every glaze color the pot has to be dunked twice
- Squirt, stamp, and/or wipe any additional design aesthetics
- Move to glaze carts
- Load into gas kiln
- Fire to 2300 F
- Let cool for 2 days
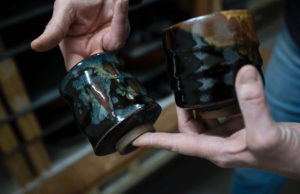
- Unload gas kiln
- Inspect each piece
- Sand bottoms of each piece dry or under water
- Wipe or dry each piece
- Place on shelves to sell or directly in Gallery
- Pull any items that are special orders
- Inspect piece
- Box piece
- Add care instructions
- Create label for box
- Set box by door for shipping pick up
- Deliver to your door
- You unbox
- Start using it!
Our pots are made to be used. And that’s how pots take on a life of their own!


